Tuesday, March 27, 2012

Optical Comm: March 26


This Topic Consider Situation of Interconnection of Computer Chip

  • 電子connection 的問題: pin count proportional to bandwidth, large pin will be needed.
  • Electronic interconnect limits over all system performance.
  • Optical interconnection provides more bandwidth possibility.
  • Optical approach can be more easily modulated for multiplexing, and bit modulation => Power Efficiency
  • All optical systems require no additional EO conversion, which is power consumption.
  • Electronic system needs buffer when bus is busy, this is proportional to the core number , but optics need only optical relay device to hold signal.


  • Optical routing is immunity to computer scale, which can reach up few meter.


  • Use waveguide incorporate total internal reflection can reach 45 degree turning. 
  • X^3 Effect changes refractive index through carrier concentration, while X^2 uses electrically to modulate the refractive index.
  • refractive index of Silicon is 3.5, silicon nitride is 2.4. For a ring coupler, if difference of refractive index is large, the light is very confinemneted in the waveguide so the evalancent wave is small, causing the gap between waveguide and ring is small.


Friday, March 23, 2012

MacSoft : Aptana studio

 用來編輯Webscript 的. Open Source, 不用錢. 太妙了我居然有下載這種東西.


http://aptana.com/

Fabrication : Etching - Overetch is useful

 一般來說Overetch 可能會侵蝕到原本不想蝕刻的地方, 導致Pattern distortion. 不過有時候倒是能夠利用Overetch 底下的面積, 來縮減Pattern間的間隙. This is called controlled overetch.  以下按例附圖XD


Fabrication : Photolithography Roadmap

我覺得讀書, 有好的圖表是很重要的XD 至少對我來說是這樣. 以下放上一張Lithography的演進表,如果對Lithography的技術已經有點概念, 再回來看這張應該滿有感覺的XD


原文出處:http://chemgroups.northwestern.edu/odom/chem445/Lecture%208%20--%20Nanofabrication.pdf

Lecture : nterdisciplinary Chemistry, Engineering, and Physics

有些講義做得滿好的, 有趣的是可以看出每個老師的風格還有用心程度XDDD
其中我覺得Eril Chen的講義有條理又清楚, 不失為作為一個參考.

http://www.mrsec.harvard.edu/education/ap298r.php

Fabrication: Wet-Etching - Common Etchant


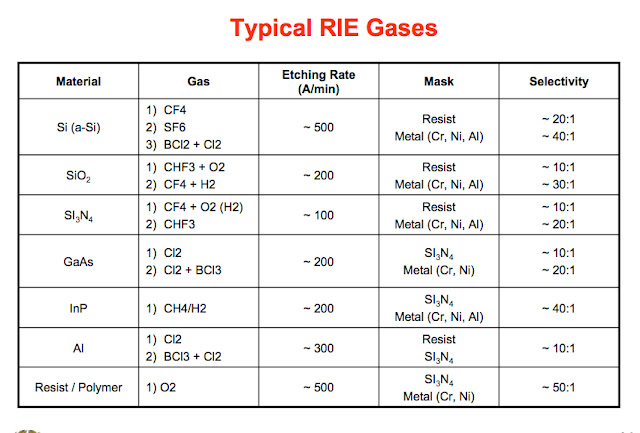
Fabrication : Dry Etching - RIE (Reactive Ion Etching)


      **Plasma 的用意在于用電性控制帶電離子方向, 藉以增加控制離子撞擊的方向性.

Fabrication : Comparison of Wet and Dry Etching


Fabrication : Dry Etching

Why Do we Need Dry Etching
(1) 更小的feature size
(2) 非等向性的蝕刻


下圖比較(Comparison)各種Dry Etching Techniques 所需要的條件(Conditions) 以及環境(Environmental)

原文轉自:
http://www.mrsec.harvard.edu/education/ap298r2004/Erli%20chen%20Fabrication%20III%20-%20Etching.pdf

Thursday, March 22, 2012

Fabrication : Lithography-Pattern Generation (Fig)

產生Pattern的方法有兩種, 一種是靠蝕刻, 比較直覺, 另外一種則是靠Lift Off的技術, 用圖示意專有名詞比較容易了解, 以下附上圖. (The right one is a bit wrong,  the film was gone in second diagram)

通常在蝕刻時, 因為蝕刻的方式, 化學液材料而有(不)等向性的問題. 造成所謂的過度蝕刻, 或是蝕刻不足, 以下兩張圖用以示意這些名詞定義.


Fabrication : Wet Etching - (矽,GaAs)晶體切面圖


Note: 讀濕式蝕刻時提到Etch Rate 與晶體表面Orientation 有關, 亦即不同面向有不同的蝕刻率.
底下兩張是比較好表示的圖, 覺得<111>平面有特別顯示54.7度角比較不容易跟<110>平面搞混


(a) Si的 Crystalline Structure. 
Surface Atom Density:
{111} > {100} > {110}
Etching rate:
                                                               R(100) ~ 100 x R(111)

(b) GaAs 的晶體表面圖. Group V的蝕刻率較大, 因為提供了許多電洞可以氧化. V族的<111>平面稱為B Face, III族則稱為A Face.

Sunday, March 18, 2012

Latex: 自定義指令

Use \newcommend{\指令名稱}[Input] <Command>

Ex.


\newcommand{\wbalsup}[1] {This is the Wikibook about LaTeX supported by #1}
\newcommand{\wbalTwo}[2] {This is the Wikibook about LaTeX supported by #1 #2}
% in the document body:
\begin{itemize}
\item \wbalsup{Wikimedia}
\item \wbalsup{lots of users!}
\item \wbalTwo{John}{Doe}
\end{itemize}


引用: http://en.wikibooks.org/wiki/LaTeX/Customizing_LaTeX (上有圖形化範例.)


Latex: 表格包含註解


需要引用宏包 \usepackage{booktabs,threeparttable}

Note: 用 \tnote{標號} 在需要的地方做記號
Note: 用以下語法在\end{tabular} 之後 \end{threeparttable}之前作注解文字
        \begin{tablenotes}  
        \item[標號1.] : 註解內容
        \item[標號2.] : 註解內容
        \begin{tablenotes}
 
% $Id: example21.tex,v 1.2 2004/01/31 15:02:08 edt1023 Exp $
% This example borrows from Donald Arseneau's threeparttable.sty,
% and modified it to fit booktabs package.
% example21.tex
\documentclass{article}
\usepackage{booktabs,threeparttable}
\parindent=0pt
\begin{document}
\centering
\begin{threeparttable}
\caption{The Skewing Angles ($\beta$) for $\fam0 Mu(H)+X_2$ and
   $\fam0 Mu(H)+HX$~\tnote{a}}  % ? \tnote{} ????????
\begin{tabular}{rlcc}
\toprule
&   & $\fam0 H(Mu)+F_2$ & $\fam0 H(Mu)+Cl_2$ \\
\midrule
&$\beta$(H)  & $80.9^\circ\tnote{b}$ & $83.2^\circ$ \\
&$\beta$(Mu) & $86.7^\circ$ & $87.7^\circ$ \\
\bottomrule
\end{tabular}
\begin{tablenotes}  % ? tablenotes ????????
\footnotesize
\item[a] for the abstraction reaction, $\fam0 Mu+HX \rightarrow MuH+X$.
\item[b] 1 degree${} = \pi/180$ radians.
\end{tablenotes}
\end{threeparttable}
\end{document}


原文參考:http://edt1023.sayya.org/tex/latex123/node9.html

內有表格圖形範例連結

Latex: 三線表格

Note: \toprule 需引用 \usepackage{booktabs}


\begin{table}[htbp]
 \caption{\label{tab:test}示例表格}
 \begin{tabular}{lcl}
  \toprule
  姓名 & 年龄 & 地址\\
  \midrule
  张三 & 32 & 中华人民共和国\\
  李四 & 12 & 中华人民共和国\\
  王五 & 24 & 中华人民共和国\\
  \bottomrule
 \end{tabular}
\end{table}

Saturday, March 17, 2012

Friday, March 16, 2012

Latex: 公式微調 (公式過寬,水平間距調整)


專門用來處理有一點過寬的公式, 通常是變兩行嫌太少, 縮成一行又放不下.
可以用\! 來縮減間距. 尤其是對其符號 & 常常會多出一個空格. 可以用以下指令調整
LATEX 中空格的距离大致如下:
具体的间隔大小为:
\quad           1em,em代表一个字符宽度
\qquad          2em
\,              3/18em
\:              4/18em
\;              5/18em
\!             -3/18em ,这个比较特殊,不仅不会增加空格,还会把间距给减小1/6个字符,这个有时可以用到,比如输入模的时候||x||,可以用这个把两个|的间距缩写点,这样更加美观。
-----------------------------
我们利用上述的 \!命令加在公式-1中,如加在等号两侧,如加在某些 + 号两侧,来微调,缩短公式长度。
% 公式-2
\begin{eqnarray}
\dot{x}(t)\!=\!\bar{A}_{i}x(t)+\bar{B}_{i_{1}}x(t)+\bar{B}_{i_{2}}x(t)+\bar{B}_{i_{3}}[a_{i}(t)\!+\!b_{i}(t)].
\end{eqnarray}

Latex: 生成公式


1.自动编号的单行公式环境是
\begin{equation}

\end{equation}
不参与自动编号的单行公式环境:
\[

\]
人工编号的单行公式可以使用Tex原有的行间公式标记
$$公式 \eqno 编号 $$ 将编号放在右边
$$公式 \leqno 编号 $$ 将编号放在左边
引用时候可以直接用$编号$即可。
例如,$$a^2+b^2=c^2 \eqno (**)$$
由公式($**$)即可得到结论。
一般情况下,行间公式 $$…$$也可以用\[…\]表示
但对于这种人工编号的公式,不能用\[..\]代替$$…$$.
2.单个公式很长,需要换行,但仅允许生成一个编号时,可以用split命令
\begin{equation}
\begin{split}
a &= b \\
c &= d
\end{split}
\end{equation}
注意:每行只允许出现一个“&”,使用split命令后,编号上下居中显示。


3.多行公式:(記得&的符號要加,不然Latex不知如何對齊,會有錯誤指令)
\begin{eqnarray}
左 & 中 & 右\\
左 & 中 & 右\\

\end{eqnarray}
该环境对多行公式每行都加自动编号,如果相对某行不加编号,可在换行之前添加命令\nonumber


Note 1: 
=& 式1.
=& 式2.  最後等號會對齊


Note 2: 
若有加入\label 則換行號 \\要加在\label後面 才會引用到正確的標號, 否則會引用錯誤(不會有編輯錯誤 但是引用標號會出現錯誤數字).


Ex:
=& 式1.
\label {XXX} \\
=& 式2.  最後等號會對齊

\label {YYY} \\


如果要改变公式的自动编号,可以重设计数器初始值:
\setcounter{equation}{数}
下一个编号自动加1。
4.方程组的排版:
多个公式,每个公式自动编号。
1) gather环境
是下面align环境的一种特殊情形。
\begin{gather}
a &= b \\
c &= d \\

\end{gather}
>>1.如果其中某几行使用同一个编号,则需要内嵌一个split环境。
>>2.命令\notag可使当前行不编号。
2) align环境
可使几组公式并排在一起,即在同一行显示多个公式,方法是跟以前一样,使用”&”对齐。
可替代gather环境。
3) 以上几种方程组环境,无论每个公式多小,都会占满一行。使用相应的\gathered,\aligned环境,则只占据公式的实际宽度,整体作为一个特大的符号与其他符号一同处理。
这个结构还可以添加位置参数,以决定与其他符号的竖直对齐方式(b,t)。而且这种环境不再具有自动编号功能。
例如:
\begin{equation}
\left.
\begin{aligned}[b]
a &= b+c \\
d &= b+c
\end{aligned}
\right\}
\Longrightarrow
\qquad a=d
\end{equation}
这里更正参考文献中P149页的一个小错误。就是\right}应该改为\right\}.
【参考文献】
1.陈志杰等,LATEX入门与提高(第二版),高等教育出版社,2006.5

Latex: 讓圖形並排

Latex語法: 圖形並排


\begin{figure}[!ht]
\centering
\subfigure[subfigure 1名稱] {
\label{subfigure 1標籤}
\includegraphics{圖檔位置}
}
\hspace{1cm}
\subfigure[subfigure 2名稱] {
\label{subfigure 2標籤}
\includegraphics{圖檔位置}
}
\caption{外圍標籤}
\label{整個圖形標籤}
\end{figure}